
-
Minimalistic, no-frills design
-
Supports NFTs and 5,500 cryptocurrencies
-
Buying crypto directly from the wallet is tedious
-
Sole responsibility to safely store the cold storage
Overview of the Ledger Nano
To back up a bit, there are two types of wallets: hot wallets and cold wallets. Hot wallets are connected to the internet and are typically available online or on your smartphone. Cold wallets cannot be accessed through the internet and are most often physical devices where cryptocurrencies can be stored securely offline. Cold wallets let you have complete control of your cryptocurrencies thanks to self-custody. It means that you hold the keys to the wallet and manage access to it, contrary to a wallet on an exchange, where the company holds your keys.
The Ledger Nano S Plus’ predecessor, the Nano S, casts a long shadow. Launched back in 2016, it was a bestseller among hardware wallets, with the company reportedly selling over 4.5 million devices. However, most of the popular cryptocurrencies today were not around when the Nano S first came to market, and few people were interested in NFTs at the time.
Fast forward to the present: The new Nano S Plus seems to have caught up with the times. As crypto has moved even farther into the mainstream, the market has grown to include new wallets for users of all levels, from complete beginners to institutional-grade investors.
In today’s market, the Nano S Plus will not only compete with myriad other hardware wallets but all the self-custodial, hot wallet solutions offered by exchanges and software providers, too.
What’s in the Nano Ledger box
The brand new Ledger comes in a matte black box with a silver silver sleeve. Opening it, you will find:
-
The Ledger Nano S Plus hardware
-
A USB cable to connect the Ledger to the computer (USB on one end, Type-C on the other)
-
A bright orange box with three notepads for the Secret Recovery Phrase (also known as seed phrase)
-
A pastel purple box with the manual instructions
-
A key-holder chain with a Ledger logo
Ledger Nano S Plus and its accessories (Krisztian Sandor/CryptoX)
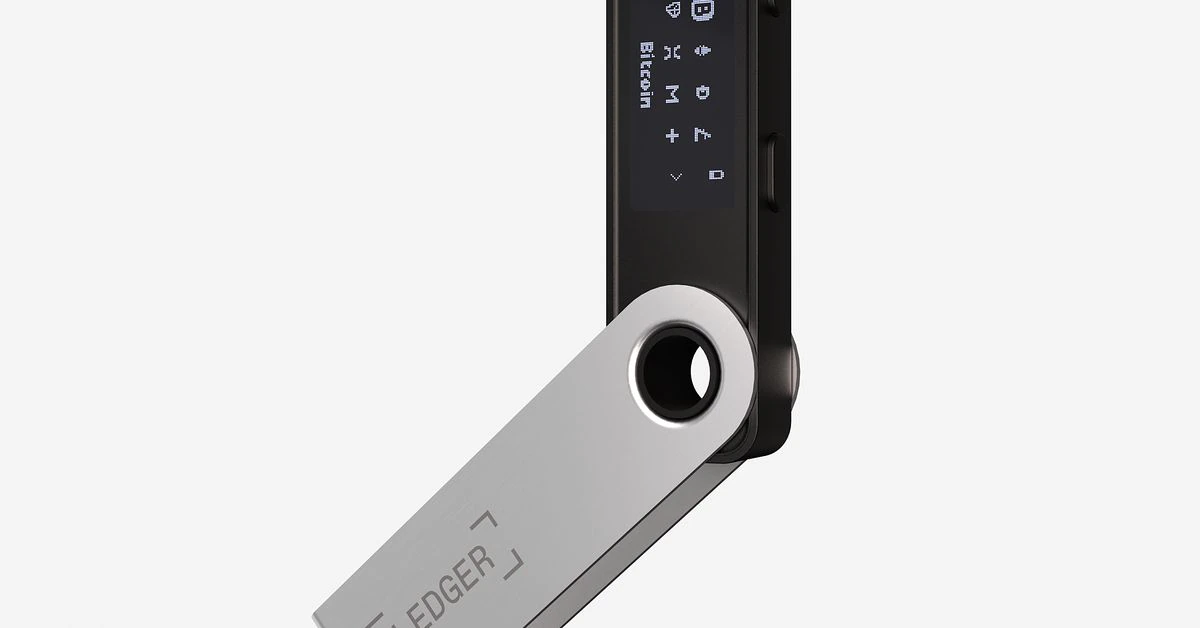
The hardware wallet looks like a fancy, elegant thumb drive covered by a signature polished metal wing. The matte, rounded shell sports a small, monochrome screen of 128 x 64 pixels, which is perfectly large enough for the job.
The device has two buttons on the side for navigation. They are easy to use and accurate but feel wobbly and clunky, which botches the otherwise premium impression. On its top, you find the Type-C plug to connect the wallet to the computer.
The USB cable that comes within the box stays firm in the device, and the textile, shoelace-like cover keeps the cord untangled.
Overall, I loved the no-frills, less-is-more design. I can see how keeping it simple would help beginners and first-time owners avoid any confusion when navigating the wallet and its buttons.
How to set up the Ledger Nano S Plus
One of my worries about using cold storage prior to this trial was how complicated and intimidating it would be to get up to speed. That fear ended up being unfounded, at least with this device.
Setting up the hardware wallet was fairly easy and took less than 30 minutes. The instructions for each step in the process were clear to follow and the whole experience felt quite seamless.
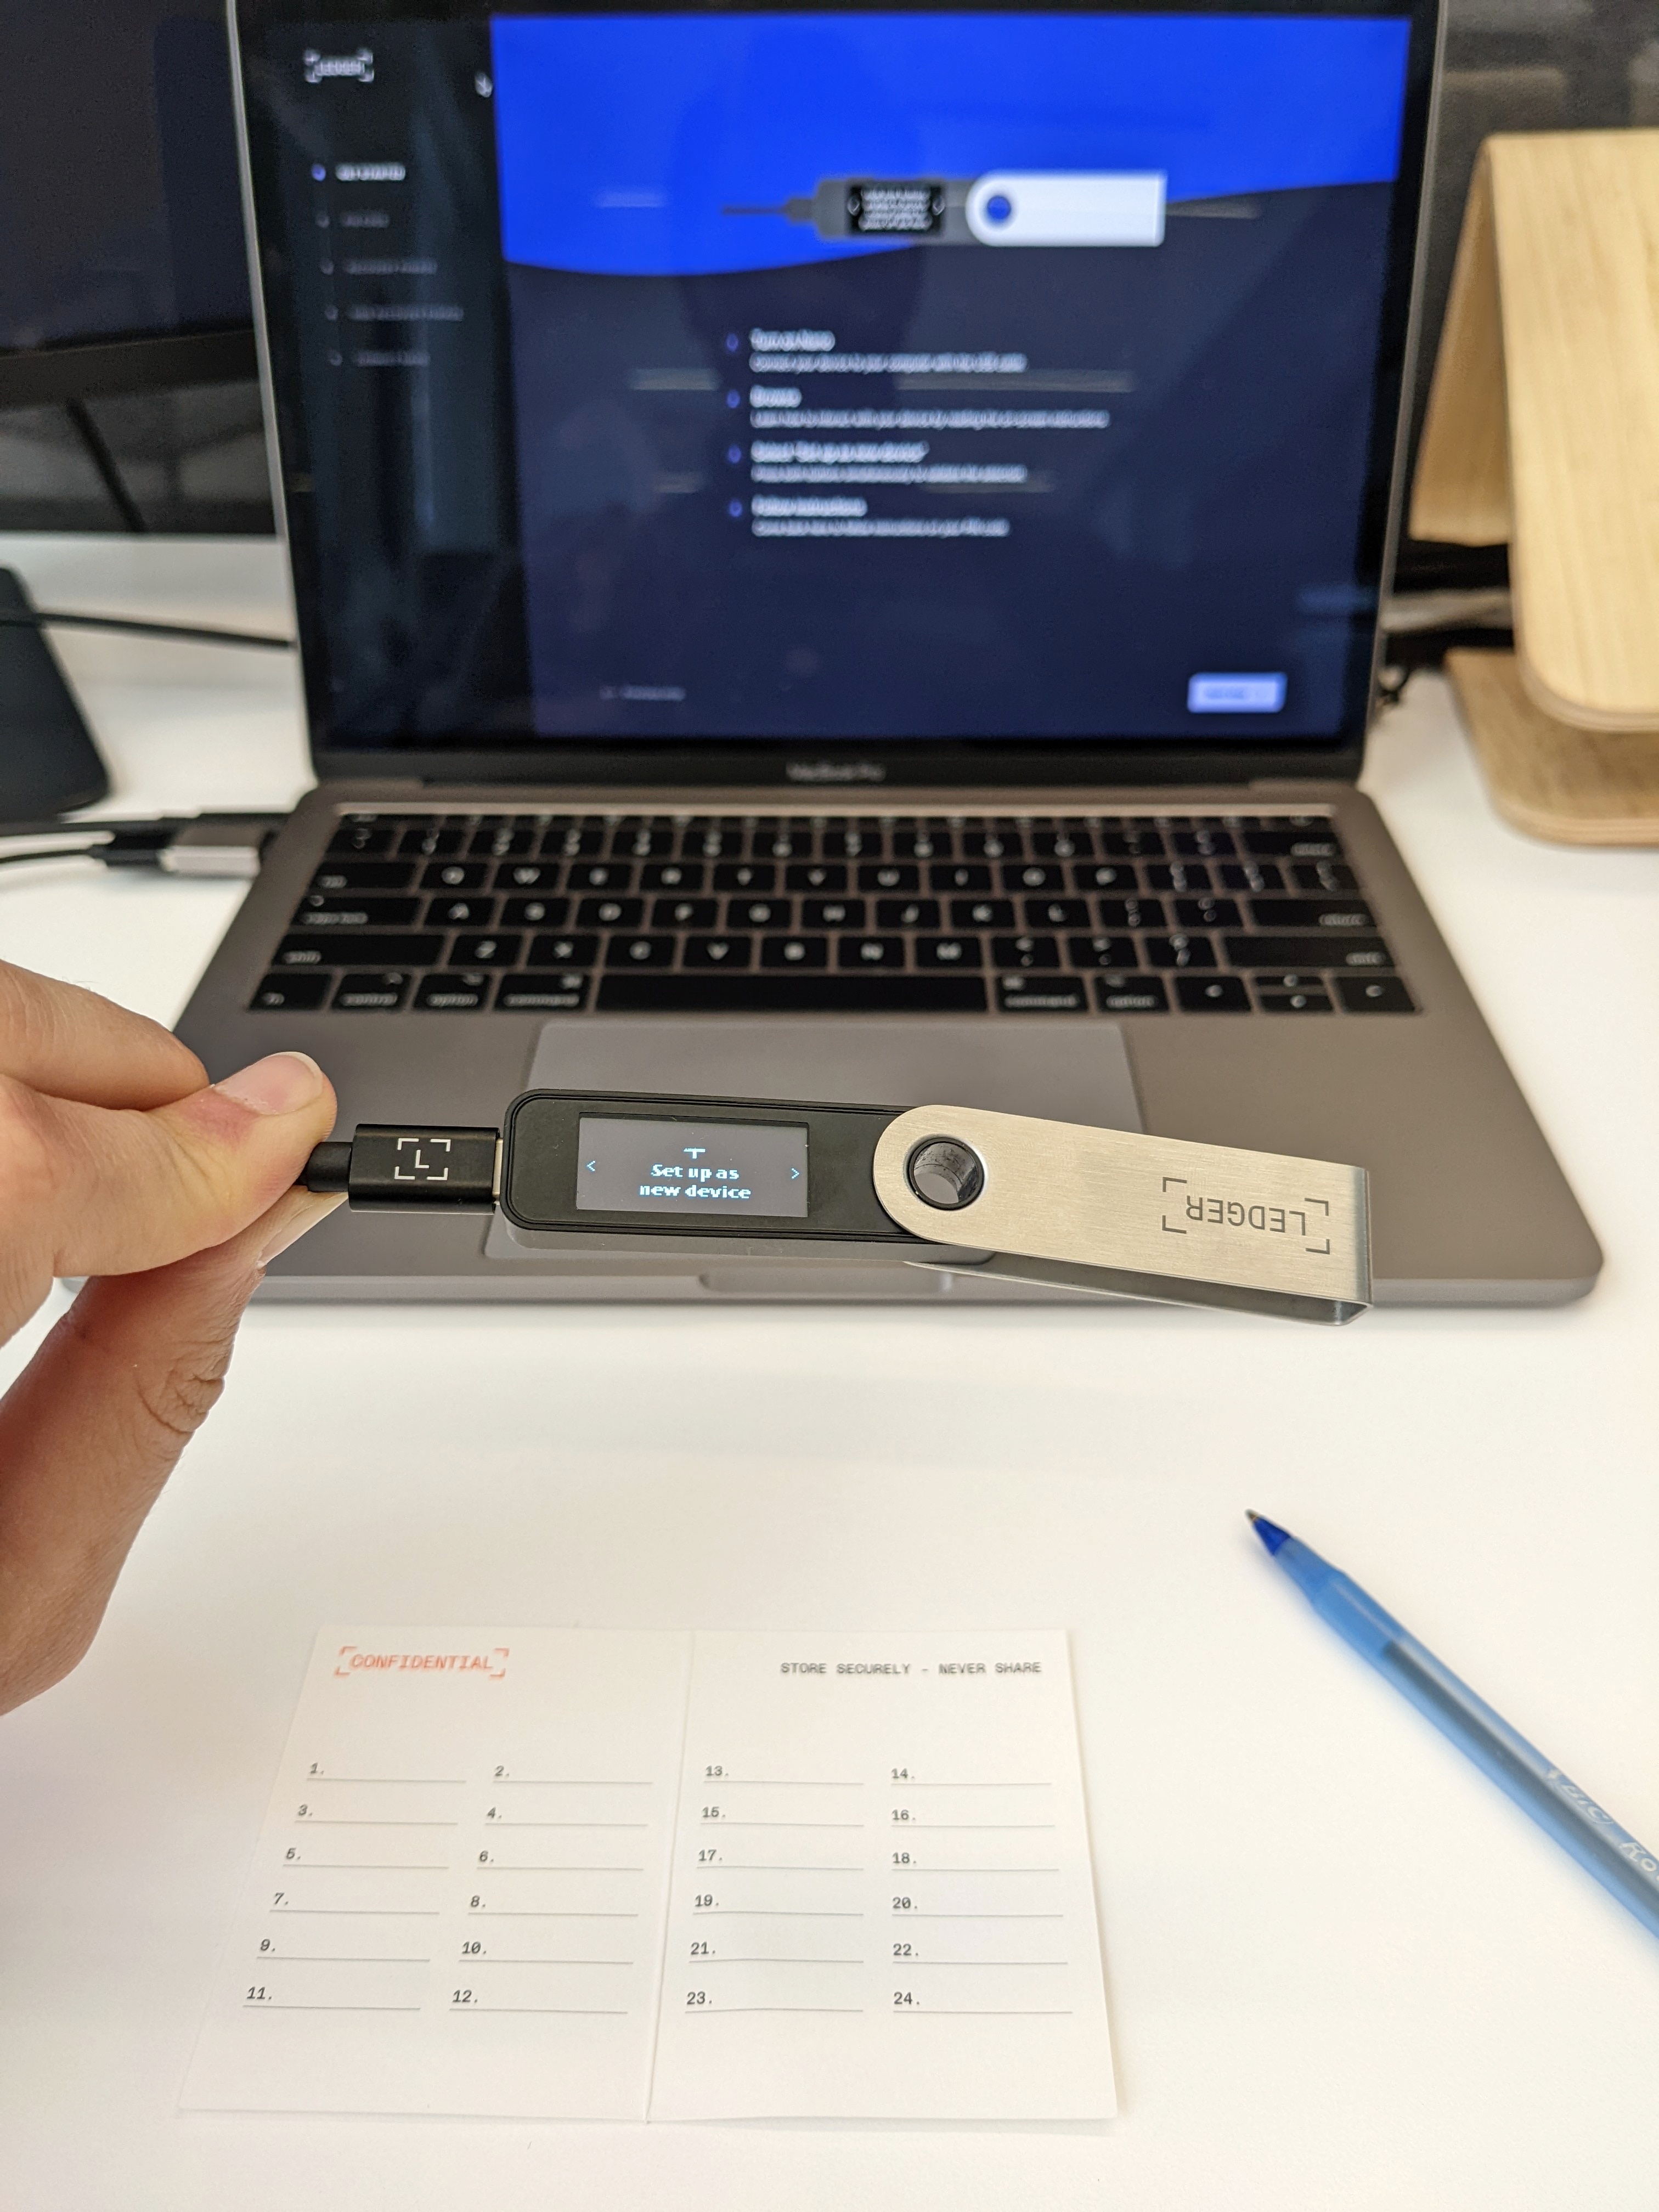
Setting up the Ledger Nano S Plus (Krisztian Sandor/CryptoX)
First, you need to download and install Ledger’s app, called Ledger Live, from the company’s website or a mobile app store. It is available in desktop version (Windows, Mac) and mobile version (Android, iOS).
Once you’ve installed the app, you connect the thumb drive to the computer with the cable it came with. The Ledger has a Type-C socket and the other end of the cable is a standard USB plug. (A USB-to-Type-C converter would come in handy for connecting to a smartphone.)
At this point you’re going to want to grab a pen and a safe place to write some important information down.
The next step is to set the PIN code, which is four to eight digits long. It functions in a similar fashion as the unlock code for a phone. You will need it every time to turn on the hardware wallet and validate every transaction, so this is the first thing you’ll need to write down on paper. Do NOT take a photo of it or make any digital copy – this creates an avenue for hackers to steal your crypto (provided they find and gain access to your physical Ledger device).
Next comes the Secret Recovery Phrase: 24 randomly generated words, also called a seed phrase. This is the second thing you’re going to need to write down, and make sure you get all 24 words exactly right. The app will ask you to confirm the seed phrase by choosing the correct one from 4 choices. Repeat for all the 24 words.
The seed phrase is your last resort if something happens with the device, so it’s important to store this information somewhere safe and private. If you lose or damage your hardware ledger, you can recover your funds by purchasing a new Ledger device and importing your account by entering the 24 seed phrases. Lose the seed phrase, however, and your funds will be gone forever.
When this is all set, the software runs a security check on the hardware to see whether it has been compromised or not. This is more commonly a problem with second-hand hardware wallets, which is generally not recommended.
How to use Ledger Nano S Plus
To manage your assets with the Ledger Nano S Plus, you need two things:
-
A computer or a smartphone to connect to the wallet
-
The Ledger Live application

Ledger Live desktop application (Krisztian Sandor/CryptoX)
The Ledger Nano S Plus always needs to be connected to a device like a laptop or tablet to be used. More advanced (and expensive) cold wallets can work by themselves for most, using a device to manage the wallet won’t be an issue, plus you have the advantage of using a bigger screen than the Ledger’s display.
The sample gadget I tested had a limited selection of coins but Ledger says the wallet will support over 5,500 different cryptocurrencies when it goes on sale April 5, 2022.
The Ledger has an operating system called BOLOS (Blockchain Open Ledger Operating System). You can download plenty of additional applications from Ledger’s own app store, Discover, via Ledger Live.
The storage of Nano S Plus has been upgraded to 1.5 megabytes, which offers plenty of space for its purpose, more than enough to install 100 applications.
How to add an account to your wallet
If you want to hold a specific cryptocurrency on the wallet, you have to download and install its application on the Ledger Live app. These apps grant you access to the blockchain of your chosen coin. Let’s say, you want to hold bitcoin on your Ledger. Here’s how you can do that:
-
Click on “Manager” on the left menu bar in the Ledger Live app on your computer or smartphone.
-
Unlock your Ledger with your PIN code.
-
The App Catalog will appear showing all the possible cryptocurrencies you can store in the wallet. Select the one you would like to store and click on install.
-
Then click “Add account” for that cryptocurrency.
-
A window pops up on your Ledger Live app and a sign on the Ledger’s screen to “Open app” for the chosen cryptocurrency. Push the two side buttons at the same time to proceed.
-
After a few seconds, you can name the account and you’re done.
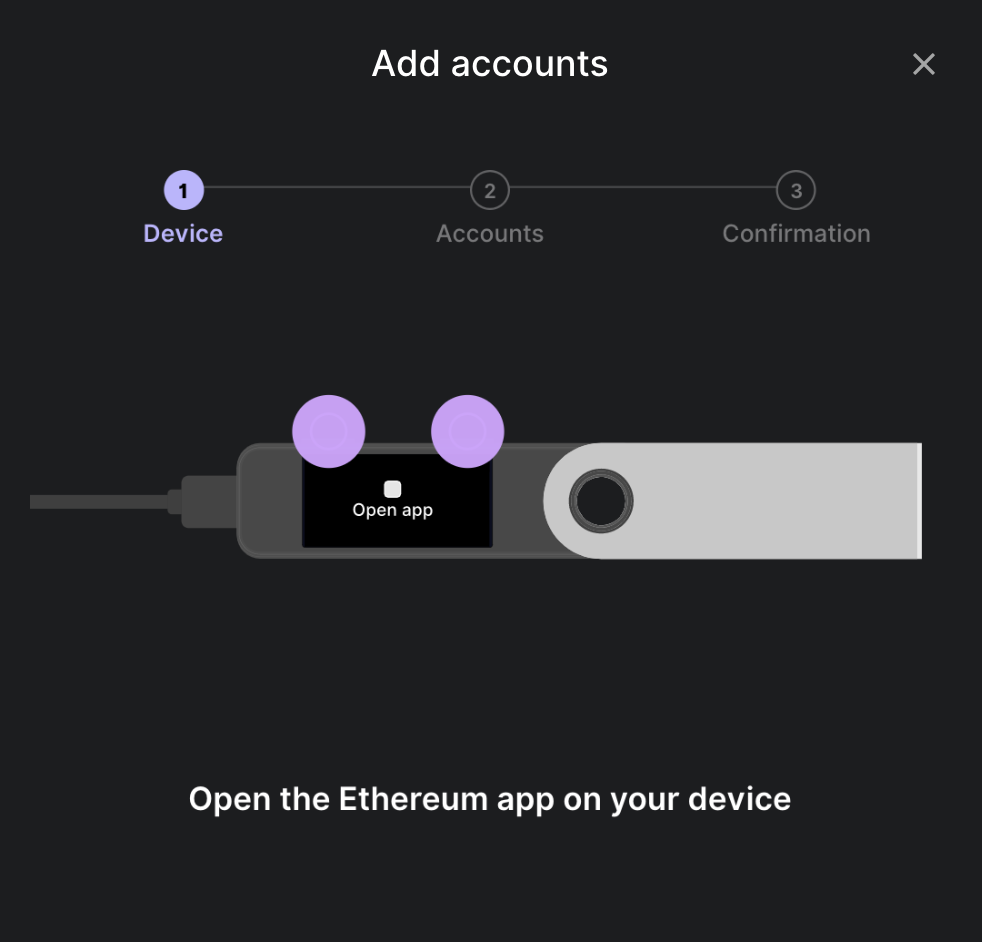
How to add a new account to the Ledger Nano S Plus (Krisztian Sandor/CryptoX)
Most of the bigger cryptocurrencies and their blockchains are supported by the Ledger Live app. It gets trickier when you delve deeper into lesser known coins, because they often require third-party wallets. If you are interested in them, it’s best to check Ledger’s website how you can store them.
How to move your crypto to cold storage
Moving assets from an exchange to cold storage is the most important function you will use a hardware wallet for.
These are the steps you’ll need to follow to achieve this using the Ledger Nano S Plus:
-
Connect the device and open the Ledger Live app.
-
Select “Receive” on the menu on the left and copy the address on your screen.
-
Log in to your exchange account and select withdraw funds (it varies by exchanges).
-
Paste the wallet address you copied from the Ledger Live and set the amount of tokens to withdraw.
This was the first time I’d ever moved digital assets from an exchange to cold storage, and the whole process was actually much faster and easier than I expected. Even making sure to get the address right was less intimidating than I thought.
As a test, I withdrew 10 MATIC from my exchange account to the Ledger Nano S Plus device. The tokens (minus the 0.1 MATIC transfer fee) appeared in the Ledger Live app within five minutes.
Processing time and fees depend on the blockchain you use for the transfer.
How to buy and sell crypto
Hardware wallets are a blockchain-only solution, so you cannot deposit and keep fiat currencies on it. This certainly makes them less convenient than hot wallets or exchanges but remember, what you lose on convenience you gain on security.
The Ledger lets you buy and sell cryptocurrencies directly on the device with a couple of third-party applications such as Banxa, Coinify and Moonpay. They act as intermediaries between the fiat and crypto world and let you use your dollars (or euros, pounds, pesos, etc.) to invest in cryptocurrencies.
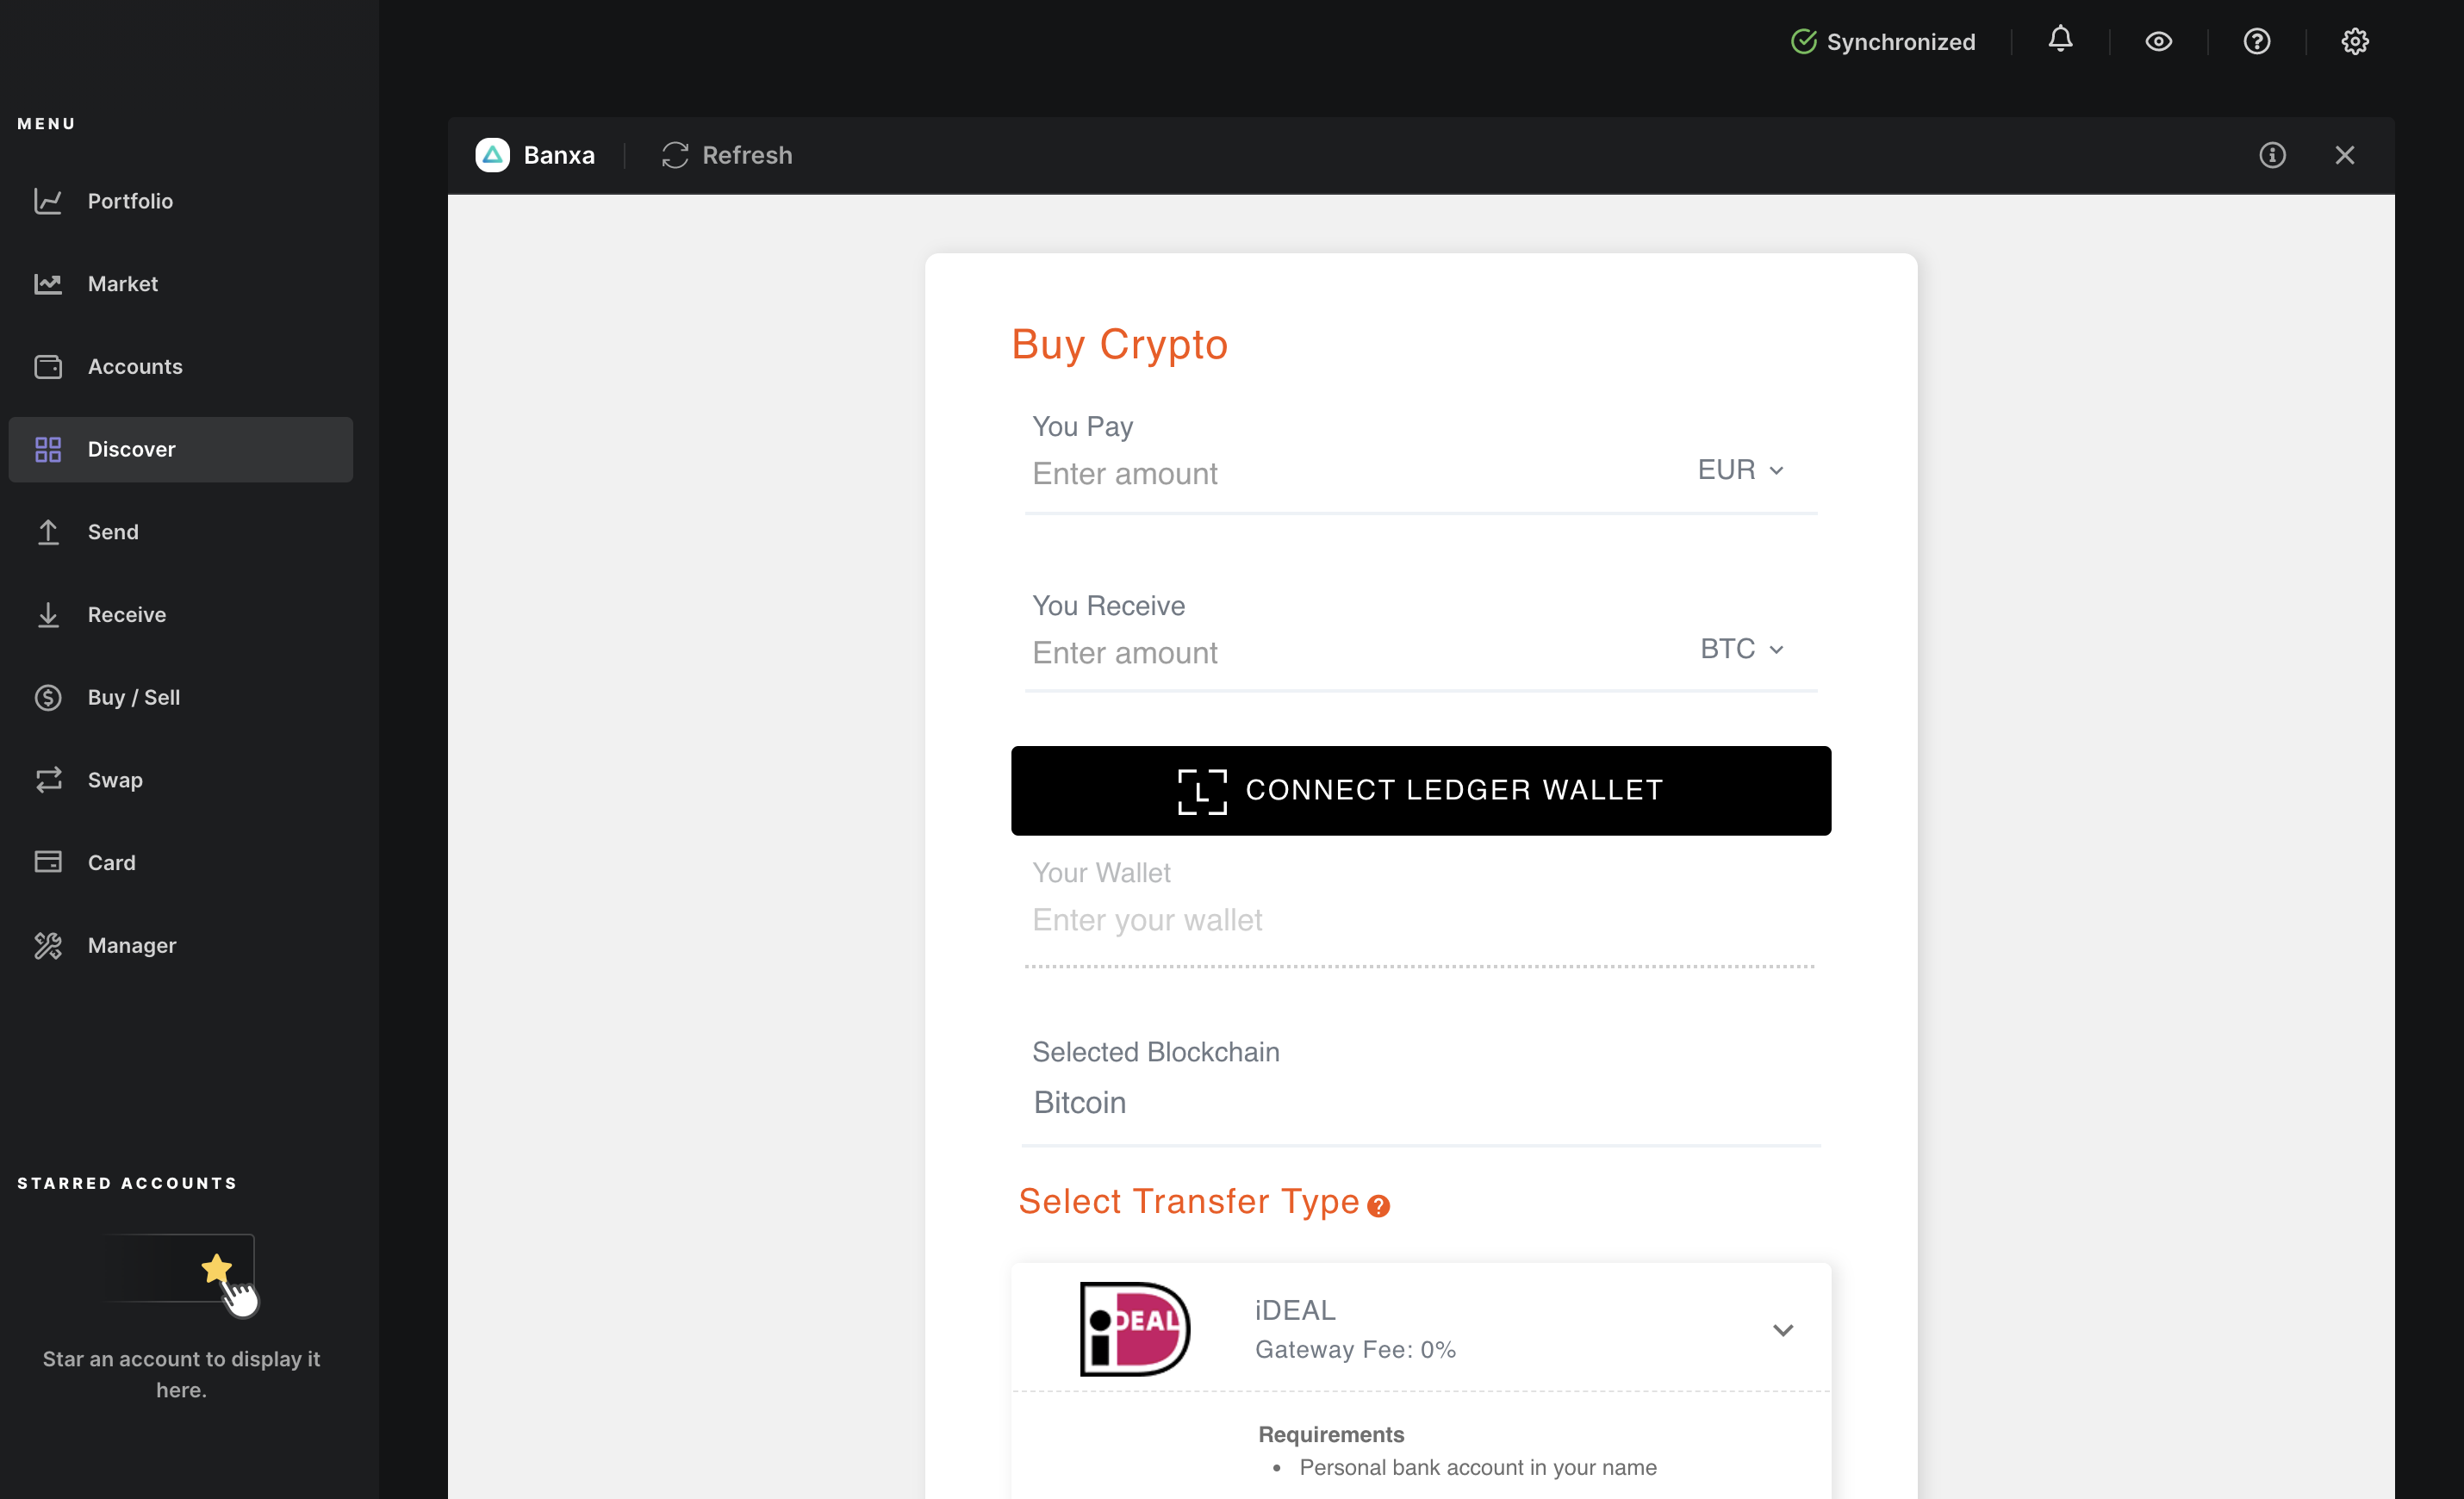
The Ledger Live app offers fiat-to-crypto on-ramps to buy crypto directly on your wallet. (Krisztian Sandor/CryptoX)
These fiat-to-crypto on-ramps are key for making crypto accessible for everyday people. Unfortunately, though, most providers require extensive identification checks, charge outsized fees or don’t serve certain regions or states. I spent an entire morning trying to find an on-ramp that could make a transaction.
The shortcoming of on-ramps are not Ledger’s fault but it points out a crucial obstacle for the crypto industry to solve. It is a missing piece of the puzzle that easily scares the less experienced users away. I recommend using exchanges for purchase and sales, and keeping the Ledger for storage.
So, for whom is the Ledger Nano S Plus intended?
The Nano S Plus is ideal for people who have already made their first steps in crypto, are thinking about holding (or HODLing) digital assets as a long-term investment and want to take full control over the ownership of their digital assets.
For those who are just starting their journey in crypto, beginning with a hardware wallet is perhaps too big of a step – unless, of course, you’re investing large sums of money and need the additional security that comes with collet wallet storage.
The extra security comes at the expense of being completely responsible for your assets.
If you lose your physical device or misplace the written-down copy of your seed phrase, there is no way to recover access to your coins. The same happens with transactions. If you want to send crypto and make a mistake typing the receiver’s wallet address, there is no central authority at hand to reverse the transaction.
While hacking a hardware wallet is significantly more difficult than a software-based wallet solution connected to the internet, it’s not impossible. It just means someone has to take the added step of getting access to your physical device and your phrases in order to get at the assets.
Is the Ledger Nano S Plus worth your money?
If you are looking to start your journey with cold storage, the new Ledger Nano S Plus will not disappoint. With a $79 price tag, it’s an inexpensive option for a first-time user to try it out.
Sure, there are wallets out there with more advanced specs. The Ledger Nano X, for example, has a larger screen, more memory to store coins, enables connecting with Bluetooth to your computer or use the hardware wallet without any connection for $149. Ultimately, I don’t see any reason why the average investor would need more than what the Nano S Plus offers.
The Nano S Plus does a fairly good job of keeping it simple and accessible for the crypto curious who want to take ownership of digital assets in their own hands. Navigating through the user interface was comfortable, and I never felt overwhelmed by the options.
All in all, the new Ledger Nano S Plus is a great option for modern crypto holders of all levels.
One caveat I would add for people holding small sums of crypto is that they should ask themselves: Is an extra layer of security necessary and worth the extra effort at their current level of investment? If the answer is still yes – or at least not a categorical no – the Ledger Nano S Plus is well worth your money.
One of the most exciting frontiers in self-custody is to make it as user-friendly and foolproof as possible without sacrificing security and ownership and I think the Ledger Nano S Plus succeeds in delivering that experience.
CryptoX was provided a sample product by the manufacturer in order to complete an unbiased, honest review. We received no compensation for the review.


